Perhaps the most indicative feature of pistol shooting in relation to accuracy is the shooter’s grip on the handgun. In the above video shooting professional Michael Seeklander, of Shooting Performance (as well as Personal Defense Network and Top Shot Season 1), breaks down some key fundamentals in the shooter’s grip that can provide an outstanding grip and form, while seriously reducing recoil effects.
The Beginning of My Shooting Grip
When I first started shooting handguns I went through a series of grips, mostly based on what I was reading (no internet at that time), and seeing in professional gun or law enforcement magazines. Back then there were a number of options that touted to be the best for handgun accuracy. Interestingly, almost all of those techniques have gone by the wayside and are no longer being taught in most police academies or by professional shooting instructors.
One of the first techniques I used in the early 1990s was to have a full grip on the pistol with my strong hand, and then my off-hand was cupped underneath in a supportive role. This particular grip was somewhat popular with early Weaver stances. This article is not advocating for or against the Weaver, Isosceles, or other shooting methods, but instead is focusing on the manner the hands grip the pistol.
That grip position didn’t last very long though, as I quickly realized that the support hand was doing almost nothing other than perhaps helping to hold the strong hand up over extended time periods.
As you can see from this video labelled the “Exaggerated Hollywood Tea Cup” method, the shooter gains no benefit in recoil management, and even has to readjust the overall grip during shooting. Believe it or not, this was a fairly popular training method in the early to mid 1990’s. For the reasons mentioned I quickly moved on from that pointless grip technique.
A Middle Ground Grip
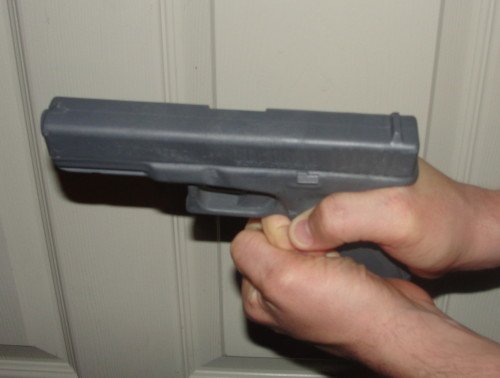
My next shooting grip also started with a firm and complete grip on the pistol with the shooting hand. This time though, I more appropriately moved my support hand up and forward so that my support fingers covered the fingers of my shooting hand, which was on the front side of the pistol grip. This allowed a much stronger pistol grip and support. The adapted grip provided a counter-balance from the pushing outward of the ghosting hand, and the slight pull back of the support hand.
However, with the strong maintaining a complete grip on the pistol, there is a gap between the palm of the support hand and the pistol grip. In addition, the support hand thumb is left out and ends up resting on top of the strong hand thumb. In that position, the support thumb often has a sympathetic response to the gripping of the strong hand thumb. When that happens there is a natural downward pull of the firearm to the left.

While shooting I was finding that there was a constant battle of balance between the strong and support hands. Only when I was particularly on could I count on a highly accurate set of follow-up shots. To add to the problem, the constant change of input from strong and support hands would cause the point of impact to dance from left to right and sometimes up and down as well.
My Best Pistol Grip Yet
Finally, I have come to find perhaps the best pistol grip I will ever achieve. My shooting hand still maintains a firm grip of the pistol, placing the web of the hand as high on the pistol grip as possible. The shooting hand fingers curl around the front strap tightly underneath the trigger guard. This will prevent any slipping of the firearm from the shooting hand.
The support hand is then placed against the opposite side of the grip with as much of the meaty part of the palm as the shooter can manage. The meat of the palm should marry up to the curled fingers of the shooting hand filling as much space on that side of the grip as possible. This also provides added support to the overall grip.
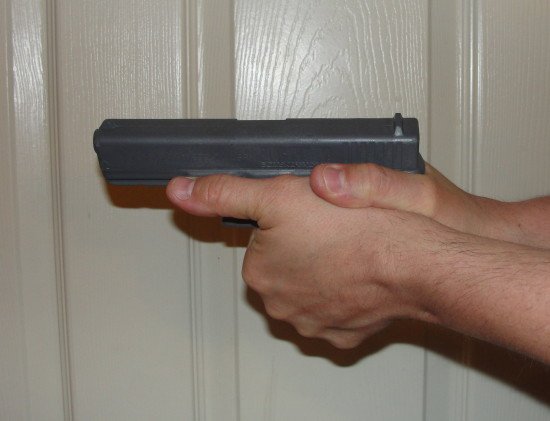
The support hand is then tilted forward until the support thumb is straight in-line with the support arm. This movement helps alleviate any “break” in the wrist during recoil, and further solidifies the overall grip. The support thumb then rests against the frame of the pistol, and finally the shooting thumb rests on top of the support thumb.
I have to admit that when I first attempted this grip style it felt completely awkward. However, with slow and methodical practice I quickly began to see results. The more I practiced the more natural this grip feels to the point that I can draw from the holster and fire at least one shot upper torso in about 1 second.
What the Professionals Say About Pistol Grip
Well-known professional shooter, Todd Jerrett, explains the 2-handed pistol grip that most firearms instructors are teaching due to its superior grip by both the shooting and support hand. This is the grip I’ve adapted with outstanding results.
In the video below, Mike Hughes of Next Level Training, shows the effects of recoil using a Fuji high-speed camera. The amount of frames per second really establish with clarity the benefits of proper grip and posture. The video shows the proper grip and one of the less effective methods. The resulting effects are clear to prove how a proper grip can improve recoil control and accuracy.
Do agree with the latest pistol grip technique? How do you hold your pistol when shooting?